

-
What is the fresh water tank?
The fresh water tank on a motorhome is a container designed to hold clean, potable water for various purposes such as drinking, cooking, cleaning, and showering while traveling. It's an essential component of the motorhome's plumbing system, providing a convenient and self-sufficient water source for occupants during their journeys. Depending on the size and design of the motorhome, the fresh water tank can vary in capacity, typically ranging from around 20 to 120 gallons or more. These tanks are often made of plastic or other durable materials to withstand the rigors of travel and varying environmental conditions. Access to the water in the tank is typically facilitated by a water pump and a series of pipes that distribute water throughout the motorhome.
-
Where is the water tank?
Many motorhomes have the water tank under slung on the underside of the motorhome, however in most cases Roller Team do fit there's inside.
-
How to Fill a Fresh Water Tank in Your Motorhome
Method 1: Using a Hose and Suitable Fittings
-
Choose the Right Hose: Select a hose that is certified safe for drinking water. Standard garden hoses can contain harmful chemicals and bacteria, so opt for a food-grade hose, often labeled as "drinking water safe."
-
Connect the Hose: Attach one end of the hose to a fresh water tap. Ensure the tap is also clean and ideally marked as safe for drinking water. Use a suitable fitting to secure the connection tightly, preventing leaks and contamination.
-
Attach to Motorhome: Connect the other end of the hose to your motorhome’s fresh water inlet. Make sure the fitting is compatible with your motorhome’s connection point.
-
Fill the Tank: Turn on the water slowly to avoid airlocks and allow the tank to fill. Monitor the process to prevent overfilling, which can cause water to spill and waste.
-
After Filling: Once the tank is full, turn off the water supply and disconnect the hose. Store the hose in a clean, dry place to maintain its hygiene.
Method 2: Using a Watering Can or Other Mobile Watering Vessel
-
Select a Clean Vessel: Use a watering can or mobile watering container that is clean and free from any substances that could contaminate the water. Ideally, use a vessel that is dedicated solely for drinking water purposes.
-
Fill the Vessel: Fill your watering can from a fresh water tap. Make sure the tap and the vessel are clean to prevent contamination.
-
Transfer Water to Tank: Carefully pour the water from the vessel into your motorhome’s fresh water tank. Use a funnel if necessary to avoid spills and ensure all the water goes into the tank.
-
Repeat as Needed: Depending on the size of your watering can and your motorhome’s tank, you may need to repeat the process several times until the tank is full.
-
Maintain Cleanliness: After use, rinse out your watering can or mobile vessel and store it in a clean location to ensure it remains suitable for future use.
Tips for Safe Water Handling
- Sanitize Regularly: Periodically sanitize your fresh water tank, hose, and any other equipment used for water storage and transfer to prevent the buildup of bacteria and algae.
- Check for Leaks: Regularly inspect your hose and fittings for any signs of wear or leaks, replacing them as necessary to maintain a safe water supply.
- Use Fresh Water Only: Always use fresh water from a known safe source to fill your tank. Avoid using water from questionable sources that may contain contaminants.
-
-
Filling Your Motorhome's Fresh Water Tank Using the Hoselock Type Method
-
Prepare the Hose: Attach a Hoselock Type connector to one end of your drinking water-safe hose. Ensure the connection is secure and free from leaks.
-
Connect to the Tap: Attach the other end of the hose to the fresh water tap using the Hoselock Type connector. Ensure the tap is clean and safe for drinking water.
-
Attach to Motorhome: Guide the attachment into the fillerneck of the motorhome and once fully inserted turn to lock home (this will avoid the hose becoming dislodged when filling
-
Fill the Tank: Turn on the water tap slowly to begin filling the tank. Monitor the process to avoid overfilling. Some motorhomes have an overflow outlet or indicator to show when the tank is full.
-
After Filling: Once the tank is at around medium pressure to avoid any over fill to come out of the breather holes, turn off the water once filled to the level required, disconnect the hose from the filler and the tap, and store it in a clean, dry place to maintain hygiene.
- Most common type - 40mm click here Water Filler Cap With Hose Fitting (40mm Neck used on some fiamma - Roller Team and others hozelock type)
- Less Common - often used on smaller camper vans Water Filler Cap With Hose Fitting (32mm Neck Hozelock type )
-
-
Tank on the inside - Pros & Cons
-
Tank on the outside - Pros & Cons
Maintaining a fresh water tank in a motorhome involves several tasks to ensure the water remains clean, safe, and free from contamination. Here are some key maintenance steps:
Regular Cleaning:
Periodically clean the interior of the fresh water tank to remove sediment, algae, and bacteria buildup. Use a mixture of water and a mild detergent or a specialized Motorhome tank cleaner. Rinse the tank thoroughly after cleaning to remove any residue.
Sanitization:
Regularly sanitize the fresh water tank to kill bacteria and pathogens. Use a Motorhome-specific water tank sanitizer or a diluted bleach solution (follow manufacturer's instructions for proper dilution ratios). Allow the solution to sit in the tank for a specified period, then flush the tank thoroughly with clean water.
Inspect for Leaks:
Routinely inspect the fresh water tank, as well as the associated plumbing and connections, for any signs of leaks or damage. Address any leaks promptly to prevent water loss and potential damage to the motorhome.
Protect from Freezing:
If camping in cold climates, take measures to protect the fresh water tank from freezing. This may include adding insulation around the tank or using tank heaters designed for Motorhomes. Drain the tank and plumbing system if storing the motorhome during freezing temperatures.
Monitor Water Quality:
Regularly monitor the quality of the water in the tank. Look for any signs of discoloration, unusual odors, or taste abnormalities, which could indicate contamination. If water quality issues are detected, sanitize the tank and plumbing system as necessary.
Use a Water Filter:
Install a water filter system in the motorhome to remove sediment, chemicals, and impurities from the water supply. Replace the filter cartridge as recommended by the manufacturer to maintain optimal filtration performance.
Proper Drainage:
Ensure proper drainage of the fresh water tank when not in use to prevent stagnant water buildup. Completely drain the tank before storing the motorhome for an extended period.
Ventilation:
Ensure adequate ventilation around the fresh water tank to prevent moisture buildup and minimize the risk of mold or mildew growth.
Monitor Tank Capacity:
Be mindful of the water tank's capacity and avoid overfilling, which can lead to leaks or damage. Monitor water usage to prevent the tank from running dry unexpectedly.
By following these maintenance steps, you can help ensure the longevity and functionality of the fresh water tank in your motorhome while also ensuring a clean and safe water supply for your travels.
To fill the fresh water tank on a motorhome with a hose, follow these steps for a safe and effective process:
Prepare the Hose:
Ensure the hose you're using is designated for potable water and is clean. If it's been stored for a while, flush it with clean water to remove any debris or contaminants and make certain it is a food safe standard, these are often blue in colour
Locate the Fresh Water Fill Port:
Find the fresh water fill port on the exterior of your motorhome. It's usually labeled and might have a cap or cover to protect it.
Connect the Hose:
Attach one end of the hose securely to the water source, such as a tap or a campground water hookup. Ensure the connection is tight to prevent leaks.
Prepare the Tank:
Make sure the motorhome is parked on a level surface and that the fresh water tank is empty or low enough to accommodate the amount of water you're planning to fill.
Open the Fill Port:
Remove the cap or cover from the fresh water fill port on the motorhome.
Start Filling:
Turn on the water source gradually to avoid sudden pressure surges. Begin filling the tank slowly to prevent overflow or splashing.
Monitor the Tank:
Keep an eye on the tank's level as it fills. You may be able to see the water level through the fill port, or you might need to listen for changes in sound as the water level rises or you may have level meter on the control unit.
Fill to the Desired Level:
Fill the tank to your desired level, usually around 80% full to allow for expansion during travel and to prevent overflow.
Turn Off the Water:
Once the tank is filled, turn off the water source at the tap or campground hookup.
Disconnect the Hose:
Carefully disconnect the hose from the water source and the fill port on the motorhome. Drain any remaining water from the hose to prevent freezing or damage during storage.
Secure the Fill Port:
Replace the cap or cover on the fresh water fill port to protect it from debris and contamination.
Test the Water System:
Turn on the motorhome's water pump and test the water system to ensure everything is functioning correctly. Check for leaks and ensure water flows from faucets and fixtures as expected.
By following these steps, you can safely fill the fresh water tank on your motorhome using a hose, ensuring a clean and reliable water supply for your travels.
Filler attachments to hoselock
Click here Water Filler To Hoselock

To fill up your motorhome water tank, you will typically need the following items:
Potable Water Source:
This could be a water hookup at a campground, a potable water filling station, or another approved potable water source. Make sure the water source is safe for drinking.
Water Hose:
You'll need a hose specifically designated for potable water use. Ensure the hose is clean and in good condition, with no leaks or damage.
Fresh Water Fill Port:
Locate the fresh water fill port on the exterior of your motorhome. This is where you will connect the water hose to fill the tank.
Hose Adapter (If Needed):
Depending on the type of water hookup available, you may need a hose adapter to connect your hose to the water source.
Below is the suggested method of emptying
Locate the tank.
On the roller Teams, these are normally inside and often beneath a seat.
This may require the removal of seat pads, moving tables or other items.
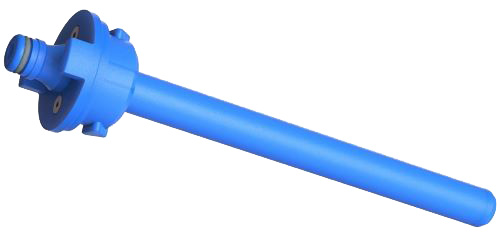
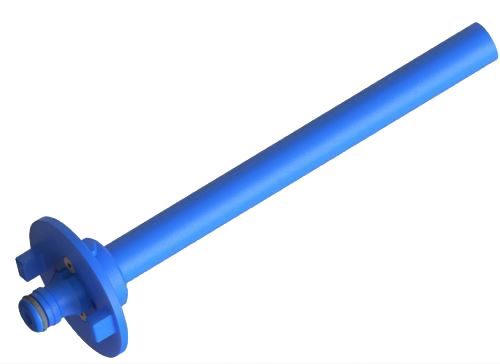
Unscrew the top
Often on the Roller Team there is a red screw top which will need to be unscrewed to expose the interals on the tank
Plugs
You will now be able to see two T bars. If you need to completely empty the water remove the lower one of the two. (the other will leave you with about 25 percent water for traveling). To remove this plug you need to left it from it's angled position to a vertical which will then allow this plug to be removed. Allowing the water to drain out
Refitting the plug
Once fully drained (or partial drained) refit the plug moving it back to the right angled position to seal it off.
Tips on how to empty your tank